
DIY crafts on March 8 from improvised. Crochet

A lot of original DIY crafts and postcards for March 8 for mothers and grandmothers can be found in this section, where fellow educators share their ideas and clearly show the results. Make sure that other handmade souvenirs for moms can be very bright, original and varied.
Contained in sections:
Includes sections:
By groups:
Showing publications 1-10 of 2691 .
All sections | Crafts for March 8. Gifts for moms
Tasks: Fix the name of the cookware and its functionality. Learn how to make applique from ready-made parts (4 big blue circles, 4 small yellow circles); learn to make a pattern in a certain sequence along the edge of a round base (plates. Cultivate independence when ...
Application "Decoration of a handkerchief for mom" (middle group) Synopsis Educational activity “Artistic and aesthetic development. Visual activity. Target: develop children's interest in artistic creativity and practical skill in working with paper. Tasks of priority educational areas: artistic...
Crafts for March 8. Gifts for moms - Collective work for Mother's Day "Flowers for lovely moms"
Publication "Collective work for Mother's Day "Flowers for dear ones ..."  Mother! The most beautiful word on earth. This is the first word that a person utters, and it sounds equally gentle in all languages. Mom has the kindest and most affectionate hands - they can do everything. Mom has the most faithful and sensitive heart - love never goes out in it. And no matter how much you...
 MAAM Pictures Library
 The purpose of the lesson: to create conditions for the formation of creativity, the development of skills for independent creative activity in the course of creating the application "Vase of Flowers for Beloved Mom". Tasks: Educational: acquaintance with the rules for constructing a creative composition with ...
 Purpose: To introduce children to Mother's Day. Tasks: To cultivate love and respect for the mother, the desire to bring joy to a close, dear person, and also to develop competent speech. Materials: glue brushes, glue, blanks of flower parts from colored paper. Integration...
 Master class for parents with children "Together with mom!" Author: Demidova Svetlana Pavlovna For our kindergarten, Mother's Day is another reason to arrange for children, their mothers have such wonderful master classes, to say “thank you” to our mothers, to give them warm sincere ...
Crafts for March 8. Gifts for moms - Abstract of the GCD on the application "Beautiful teapot for mom" for children of the older group
 Summary of the GCD on the application "Beautiful teapot for mom" for children of the older group. Purpose: To create a condition for the development of figurative and spatial thinking, visual-motor coordination, imagination and creative abilities. Tasks: - to exercise children in a neat ...
 Master class "Gift for Mom" (from waste material). Educator Lushnikova E.S. MBDOU d / s No. 30 Dear teachers and parents, I want to share with you the material on how to make a gift for Mother's Day with children from waste material. For this we need: Cocktail ...
 Purpose of work: the master class is intended for educators who will use it in working with children of senior preschool age. Such a handbag can be used as a wonderful gift for mom for any occasion (March 8, mother's day, etc.) Purpose: to make a gift...
 Project passport Master class for parents on the theme "Bouquet for Mom". Type of project: social, practice-oriented, creative. Project duration: short-term, 22 November. Project participants: children of the early age group, parents and educators Akhmatova Z.A, ...
A woman likes to receive flowers. However, most often this happens on a birthday and on the eighth of March. Especially lucky women are lucky on their wedding anniversary. Moreover, the lucky woman must first and in advance remind herself of the surprise, write down the place of its purchase and the exact cost of the bouquet, then there will definitely be an unexpected gift.
Everything is easier with children. The function of reminding and making a gift is taken over by caring teachers. There is no need to invent anything here. For example, mimosa and napkin roses look alive and look very sweet and gentle. In addition, so that the next souvenir for your beloved mother does not gather dust on a shelf or in a drawer, you can make a photo frame from salt dough. The material for the manufacture is absolutely safe, and the resulting result is very useful for home use.
A great idea for making postcards in the younger group is a flower from the palms. Surely every mother painstakingly circled the pen of her child in notebooks and signed the date. And here are three sketches - the red palm at the top of the sheet is a bud, and the other two on the sides are the original petals. The postcard is very touching and original.
We offer a selection of gift ideas for March 8 with our own hands. In this article, we have collected for you original crafts for children and adults, detailed master classes and the most useful tips. If you want to please a loved one with something simple and at the same time very beautiful and made from the heart, these easy lessons will definitely come in handy.
Any child wants to give his mother a gift on March 8 - in this collection you will certainly find great ideas. In addition, you can easily find crafts for school (for classmates and teachers), something for your beloved grandmother and just family friends of any age. Flowers, candles, candy gifts - all this and something else for your inspiration!
All the materials that we will use to create gifts for March 8 are very simple. Most likely, you already have everything you need. If it isn't, you won't have a hard time finding it in the art department or hypermarkets.
We have collected the most popular, but not banal gifts. Choose what you like the most and feel free to get down to business. A gift for International Women's Day can be made even in 15-20 minutes!
paper flowers
Paper crafts for March 8 are very popular. We invite you to make a beautiful and very delicate bouquet of flowers using the quilling technique. Such a gift will not leave anyone indifferent, because it is difficult to find a woman who does not appreciate flowers. This simple craft is a great gift for mom, grandma or teacher.

We will need:
- wire;
- colored paper;
- decorative branches;
- decorative butterflies (or cardboard and stencil);
- Styrofoam;
- flower pot or basket;
- Super glue;
- glue stick;
- quilling needle.
Please note that a flower pot or basket can be easily replaced with wrapping paper.
Earlier we already told you what it is. In the article at the link you will find useful tips on choosing paper for crafts using this technique, as well as information on how you can replace the quilling needle if you do not have a ready-made option.
Let's start creating flowers. To do this, we cut all the paper into strips 0.5 centimeters wide. It is desirable that the length of each strip is at least 50 centimeters. However, to create not too large petals, A4 sheets will be enough, which we will divide into strips (we cut along, not across).
We take a strip of white color and wrap it tightly around the needle, forming a very dense “bobbin”. Then we pull out the needle and with the help of our fingers we give the untwisted part the shape of a petal. We press the end well. The tip can be glued to the glue stick. Make at least 10 petals per flower. Determine the number of petals by the number of flowers in the craft by March 8.

Fold the yellow strip in half and then in half again. Leaving 1-2 mm on top, make a fringe for the entire length of the resulting part. Lubricate the uncut strip with glue and twist the part into a flower - this is the middle of the flower.

We connect the yellow center with the petals with superglue, this must be done from the “wrong side”. Petals should look up a little. Make the required number of daisies.

Now let's take care of the legs. To do this, cut off a small piece of wire (the length depends on the desired size of the flowers). We entangle the entire wire with a green strip of paper. From above we make the same dense bobbin as on the blanks of the petals. Raise it up a little and drip a drop of superglue. We connect with the flower itself.


You can decorate the resulting gift in wrapping paper. A bouquet placed in a pot will look even more interesting. To do this, glue a piece of foam plastic to the bottom of the basket or planter and simply stick the wire legs to the very base. We skip decorative leaves between the flowers, and plant a beautiful butterfly on top.
This craft is perfectly complemented by vintage paper butterflies. If you like homemade paper flowers, you can see how to make DIY dahlias for the holiday. This is no longer quilling, but the technique is also interesting.
Roses from beads
This gift master class by March 8 will not be difficult even for children: we will make a beautiful festive rose from beads with our own hands. This is another option for presenting flowers to your beloved women, which the recipient will definitely like. This craft is a great holiday gift for mom, sister, grandmother or girlfriend. The main value of such flowers is their stunning appearance and durability; such gifts are kept for years.

Beads can be advantageously ordered on AliExpress. Large selection of colors, excellent quality, good reviews, low price - check for yourself on the store page at this link.
We will need:
- wire for beading;
- green beads;
- base beads.
In this case, you do not need complex patterns for beading. A flower is assembled from several petals, and this greatly simplifies the task. This means that even beginners will master the master class.
We start with weaving greenery. To do this, we bite off a few pieces of wire and prepare green beads. For one leaf we need 13 beads. Take a look at the photo of how the rows are built.

Make a small knot at the end of each petal. For one beaded rose, we need at least 5 green leaves. It will be nice to put 1-2 extra leaves on the stem of the flower, but this is not necessary.


Then we weave one row at a time, constantly increasing the number of beads by 2. That is, there are four beads in the third row, six in the fourth, and so on. In total, you need to make 8 rows.

After that, along the edges of each petal, pass a row of beads to the very base to complete the leaf nicely and round the edges.

To diversify the composition, you can add a few larger green petals. It is better to weave them immediately - before assembling the flower.

The petals are slightly rounded towards the center and inserted into each other. We weave the wire together - just twist it.

We place green leaves under the base of the bud. In the center of the stem we place a couple of green leaves. We braid the stem itself with an additional piece of wire so that the craft looks neat.

An original gift for March 8 is ready! You can give one rose, making it big - with a long stem. If you wish, you can weave a few more flowers and arrange them in a beautiful homemade holiday bouquet.
Candy heart
What woman refuses sweets on her main holiday? But giving candy is just so a little boring, let's decorate it in a cute way! We will get a very beautiful present for March 8, which will appeal to girls and women of any age. You can make it yourself for a friend or offer such a craft to a child (elementary school, kindergarten) as a gift for a teacher or educator.

We will need:
- hacksaw;
- skin;
- corrugated paper (white and color);
- acrylic or spray paints;
- safety pins;
- any decor.
An inexpensive set of acrylic paints can be ordered on AliExpress (look at this link). Bright colors, excellent quality, high durability - a versatile option for a variety of crafts.
Expanded polystyrene is the same material that can be found at the bottom of the boxes in which household appliances were packed. Look carefully to see if you have this material left that will come in handy for you to create crafts by March 8th. If there is nothing suitable, replace it with foam. However, keep in mind that the foam will rustle unpleasantly when cutting and crumble.
Draw a big heart on a piece of polystyrene foam. This can be done on a stencil or freehand. A great idea is to cut out a heart from paper, and then simply trace its outline; so you can't go wrong.

We cut out the heart with a hacksaw and process the edges with sandpaper so that the craft is smooth.

In the center of the future gift, draw another heart, and then carefully hollow out the middle part. We do this with a hacksaw and a hammer. It is also better to sand the edges so that the recipient does not notice a flaw in your holiday gift.

We glue the side parts of the craft with white corrugated cardboard, its remains can be fixed at the bottom (meaning the recess). Use super glue to securely fix the decor. Line the inside of the box with pink crepe paper. Beautifully drape the edges of the product, trim the excess. The bottom can be treated with acrylic paint or spray paint. If there is nothing suitable, cover it with corrugated paper.

The gift for March 8 is almost ready! In the center we need to place the recipient's favorite candies. Safety pins are required for secure fixation. We fasten one candy at a time - just stick the needle into the wrapper (it is possible from both sides). We complement the festive crafts with decorative flowers.
You have made a great sweet gift that the recipient will definitely like. Complement the composition with a bouquet of flowers - and the recipient will be smitten on the spot! Flowers and sweets are a standard gift for March 8 for mothers, grandmothers, and girls, but all this can be presented in a very unusual and soulful way.
Beautiful rose candles
Candles are one of the best gifts for women. It is romantic, beautiful and very sweet. Especially if the gift is made with your own hands, but looks like the buds of beautiful roses. Candles make great gifts for mom (elementary and middle school kids can do this with adult supervision), girlfriends of all ages, and a beloved mother-in-law or sister.
Of course, you can find beautiful candles in any hypermarket, but in fact they cannot be compared with homemade ones. Just imagine how pleasant it will be for a person who will receive as a gift a unique thing that you have worked so hard on.

We will need:
- a few white candles (the simplest);
- candles with a metal base (“floating” candles);
- dry food coloring or red (pink) pencil lead;
- wooden skewer;
- metal plate or saucepan.
If you have crayons or pencil leads, it will be enough for you to take one of them and crumble or rub one of them. However, for saturation, it will be better to add dry food coloring. If you do not have pink or red dyes, use others - it's okay (modern roses come in yellow, and blue, and any other).
In a metal bowl, mix the dyes and rub the same paraffin from old candles into it. Save the wick ropes - they will still be useful to us. Do not throw away metal candlesticks either - we will place our roses in them.

Place the plate in a water bath or on a very slow fire and melt the mass. It should resemble jelly in consistency and be evenly colored.

Next, we need an old cutting board or any other surface that is not too sorry to scrape with a knife. Using a brush, make a few vague drops: at the bottom they should be a little narrower, at the top - wider. Do not remove the remaining paraffin from the water bath yet.

When the mass applied to the surface has cooled slightly, carefully scrape it off with a knife and roll it into a tube around the wick. Form a petal by flattening the bottom with your fingers.

Gradually build up a mass of petals around the wick. Press each new petal a little in the center and bend back, giving the shape of a bud.

Please note that the petals do not have to be the same shape. It's okay if the outer part of the petals is wider. It's even more convenient that way.

Spread the paraffin that you have not removed from the bath among metal candlesticks. Stick the formed bud into this mass and wait until the mass seizes. Ready!

If you want to make scented candles, add 10-12 drops of rose essential oil to the mixture. So when the candle burns, the room will be filled with a wonderful aroma. Additionally, a festive craft can be decorated with dry sparkles. When in contact with fire, they do not smell, and candles are made elegant.
Another great idea is colored petals. If you have several food colors and the ability to put several plates in a water bath at once, then the petals can be made in two or more colors, and then connected in random order or alternately.
This gift is appropriate to present even to an unfamiliar person. For example, such candles will be good as a gift for female colleagues. It's absolutely okay if your gifts for March 8 are homemade, because this is always highly appreciated.
If you don't have floating candles or want to "plant" a rose in a jar, take a look at this guide. However, please note that the jar is not needed ordinary, but with a wide neck, so that when burning paraffin does not flow onto the table.
Topiary for the holiday
Another great gift for March 8 is homemade topiary. This craft seems difficult, but even children can handle it. Topiary is a wonderful handmade gift for mom. In addition, it can be presented to a teacher or grandmother. The craft can become the central decoration of the holiday and will last for a very long time.
In this video tutorial, crepe paper serves as the basis for the festive topiary. However, there is nothing wrong with replacing it with something. For crafts by March 8, ready-made decorative flowers, satin ribbon roses, kanzashi flowers, paper flowers on skewers, tulips and beaded roses (see instructions above), felt or foamiran buds are suitable.
In a word, choose any material and make festive flowers, and then just stick them into the ball and decorate, as shown in the video tutorial. Such a gift will appeal to a girl of any age. If you have a child and you are going to do crafts for March 8 to school, take this instruction into service.
Choose any of the presented master classes and delight your beloved women with pleasant homemade gifts! Do not forget to complement the present with sweets or flowers to make it even more pleasant. Your work will definitely be appreciated. All the instructions presented will help you make win-win gifts with your own hands, which women and girls of any age always like.
Views: 13 994
Knitted flowers in a crochet pot. Lily flowers.
Leaves and pot acrylic yarn, flowers fine wool blend yarn, hook No. 1, 75, finished product weight 290 gr. (yarn -260 gr.), wires 90 cm, synthetic winterizer, beads.
Leaves- 9 pcs., flowers - 5 pcs.

Competition work No. 29 - Knitted cactus
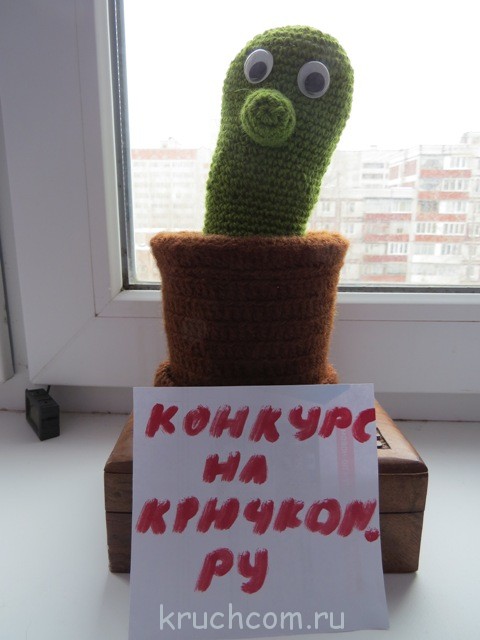
I knitted a cactus without any descriptions and patterns. The pot is double crochet, and the cactus itself is single crochet.

Competition work No. 28 - Knitted violets
Good afternoon. There are already many flowers presented at the competition. But since I decided to knit flowers in a pot from the very beginning of the competition, I present to your attention my two works)). Violets are a gift for mom on March 8, and a cheerful cactus is for granny.

Violets I knitted from a wool mixture according to the description.

Only the leaves didn’t work out according to the description, so I knitted them myself, as it turns out.

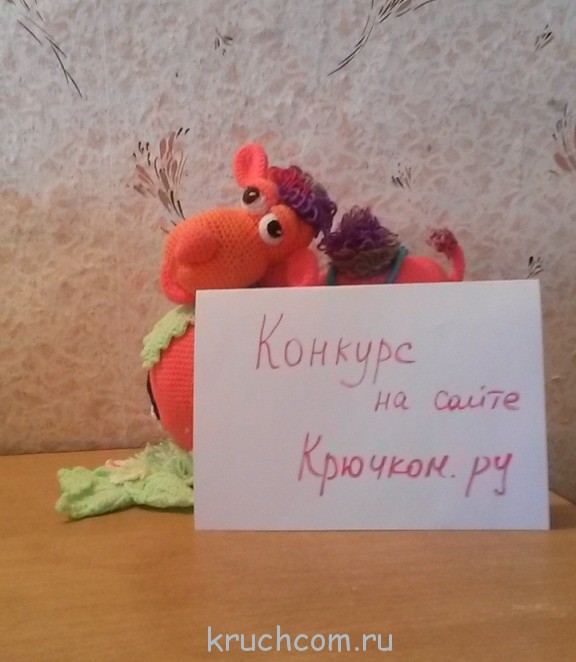
Competition entry No. 26 - Camel cub and strawberry house
My name is Julia, I'm 24 years old. I love to crochet.
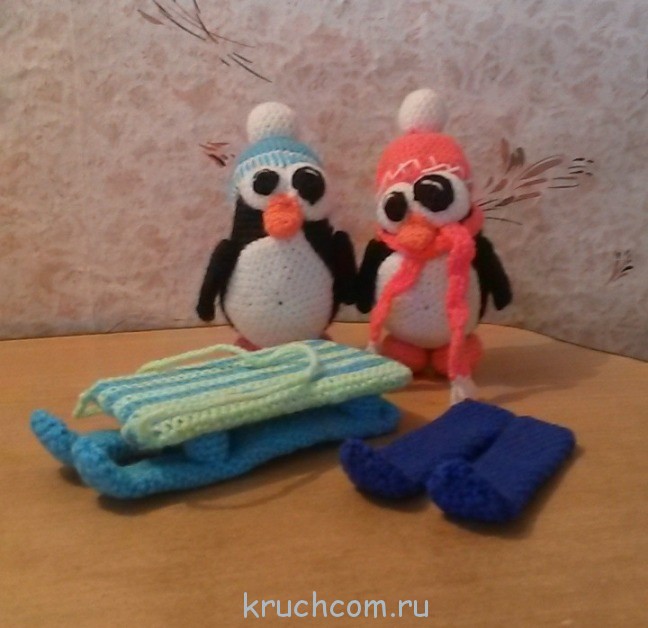
Competition work No. 25 - Knitted penguins
Hello! I want to take part in your new competition. I take part for the fourth time, so far I have not won anything, but I hope.
My name is Julia, I'm 24 years old. I love crocheting very much.

I knitted a penguin for a friend's daughter, the description is paid, so I have no right to post it.

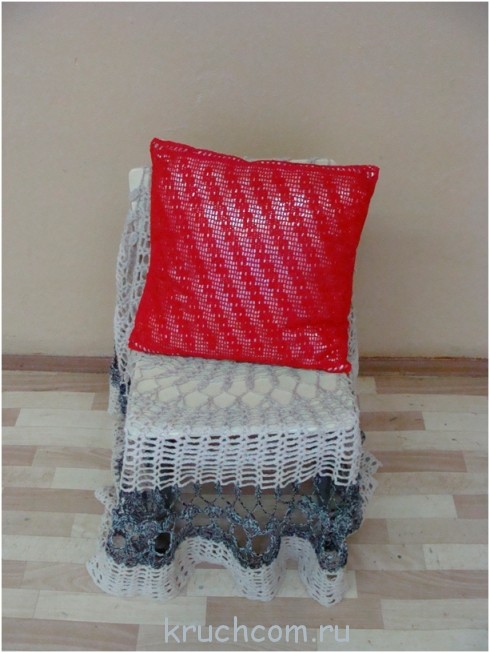
Competition work No. 23 - Knitted pillowcase
Pillowcase.

You will need 100 g of viscose yarn, hook No. 1.5.

Competition work No. 22 - Knitted shawl
My name is Maria Kozlova. I am 15 years old. I have been knitting since 2nd grade. I really like this lesson, in it I learn a lot of new and interesting things every time.

SHAWL.
You will need: 500 g. Half-woolen yarn hook No. 3.

Competitive work No. 21 - Knitted boxes "Poppies" and "Sunflower"
Hello! My name is Lilya Tokmacheva, so I decided to continue the theme of knitted boxes, they fit very simply and will always come in handy in the household! I knitted these caskets as a gift for my little nieces for the holiday of March 8 (unfortunately, it is no longer possible to photograph them with a sign)!
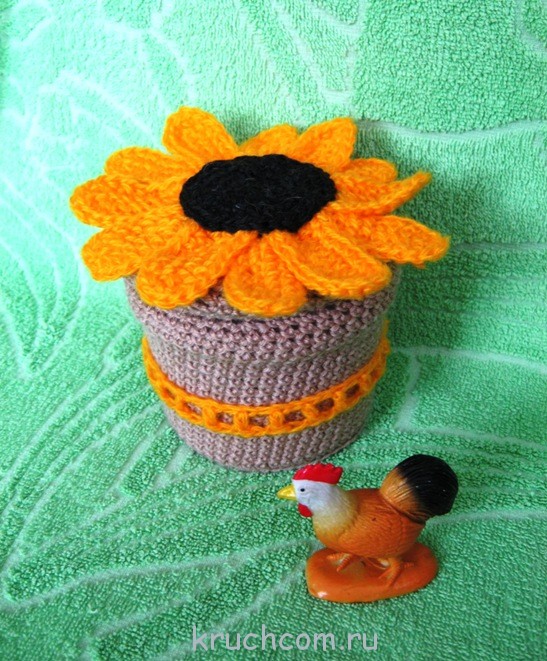
Box "Poppies" and "Sunflower", the base consists of a plastic jar of lettuce, the lid is also plastic. The scope for imagination is not limited, you can use any yarn, any colors you like!
I used leftover red and green yarn for "Poppy" and leftover yellow and beige for "Sunflower"
bottom knit the desired diameter with single crochet in a circle, adding 6 columns in each circular row. Then we knit a row behind the back wall of the loop without additions, we continue the next rows in a circle to the desired height (if you need to make reductions where you need to make a snug fit. Similarly, we knit inner part(in a different color), then insert it inside and connect the 2 parts with single crochets, we get a jar inside. Lid knit in the same way, jumper - 7-8ch, tie 2-3 rows in a circle, sew to the lid and the jar itself.

Poppy consists of 5 petals connected in a circle, the middle is the same, the border of the box is knitted from ch.
Sunflower- Dial 9-10 ch and knit in a circle making 2 additions at the end of each row, knit 4-5 rows in total!
We invite you to take part in. Submit your work to our email address [email protected].
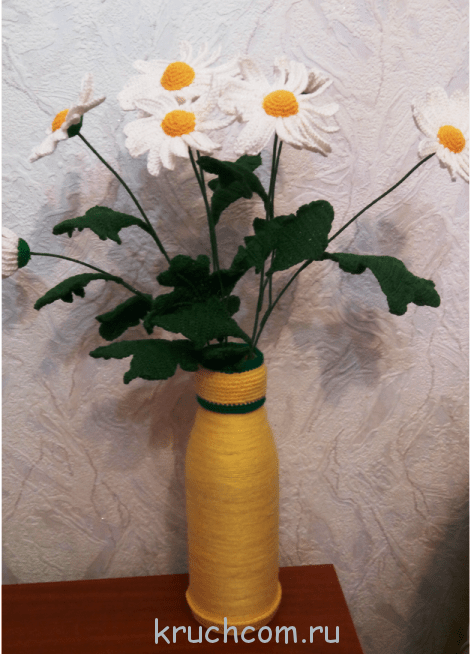
Competitive work No. 20 - Bouquet of daisies (competition conditions)
Hello! My name is Svetlana, I am 34 years old. I live in Kyiv. I love to knit, I get a lot of pleasure from it!

For chamomile we need: Iris yellow, white and green; Yellow acrylic threads - for a vase. In addition, you will need a thin needle, PVA glue, wire (for the stem and thinner for the leaf).

Related publications
-
 Fur leggings - we sew the hit of the season
Gaiters - stockings covering the shin from the ankle joint to the popliteal cavity. This is not only a modern and stylish product. They...
-
 Shugaring at home How to cook a dense paste for shugaring
Sugaring (hair removal with caramel paste) is a popular hair removal method. There are many ways to make shugaring paste at home. Thanks to...