
Bridge made of matches with your own hands. Making a bridge out of matches Bridge out of matches scheme

Arched bridge-viaduct made of matches
At least the sick leave should have a positive effect on something? At least on the website. The next debt cleanup starts with a very distant debt. I don’t know how I dared to admire this work myself, but I didn’t show it to you. But better late than never. Therefore, I present to you a model of an arch bridge made by Alexander Pogudin from Moscow with his own hands. Look at this miracle (click on the photo): ...
Before you see the photos, I advise you to get acquainted with the author of this miracle. Do not scroll through this text, as you usually do with the Software License Terms, here is much more interesting reading.
"I was born on April 26, 1991 in Togliatti, exactly five years after the Chernobyl disaster. Some time later, I moved with my family to Moscow, where I live to this day. About the family: I have an older sister, a younger brother, an idiot. I live with my mother and stepfather, peaceful relations.I calmly communicate with my father and ride to visit - he lives two trolleybus stops after mine.In such favorable conditions, I grow up, from idleness inventing various activities.In kindergarten, I began to write stories (a book with curves letters preserved to this day). Confirmation that from kindergarten - in some stories the main characters were my classmates. Stories (http://www.alexander2.ru/biografiya/rasskazy) I write to this day. I published a book in a small edition. Later there were prerequisites for modeling - modeling from plasticine (lower grades of the school), then - carpentry (this is about 5-7 grades). After that - modeling. I bought models and glued them (grades 7-9).
The stick of matches is the first creation of its kind, when I had no drawings, examples, nothing to rely on. Everything from the very beginning to the very end was invented. And, flattering myself, I will say that it was a good idea ... What prompted you to create a layout? Three things.
1. Idleness.
2. Idleness.
3. Finally gave a kick in the ass to the layout of the Eiffel Tower on one site. Not on this)
Also, sometimes from the same idleness on my computer I create a different creative. Cartoons in Macromedia Flash, editing video files and making jokes... I also sometimes like to do pyrotechnics and set something on fire or blow it up. Sulfur was recently successfully blown up, which was scraped from matches for a mock-up. For more information, dig into my LiveJournal. I also sometimes like to look at the stars through a telescope that I bought with my own money ... Ah! Also at the dacha, I make a layout of my dacha. Unfortunately there are no photos. Sometimes I draw ... from the drawings, apparently, parents and friends are delighted ...
And now about the bridge.
It all started in the dark, late at night. I naively thought that thirty boxes would be enough to build at least half of the bridge.

However, I didn't start using them right away. First I made, in fact, the basis for the layout.

Then, having cut some kind of box into parts, cutting out such figures, making cuts and connecting them to each other, we got a nice frame ...

Which was partially covered with thin cardboard from another box. I did not cover everything with cardboard, so that it would be convenient to build supports. I wanted to "sew" them into the frame, which later turned out.

For the layout, we used: a cardboard box, polystyrene foam from there, plastic wrap, foil, sand from the sandbox, a towel (for grass), a New Year's wreath (I sketched it out and made Christmas trees from "spruce" branches), about half a liter of PVA glue, fabric, paper clips, nails, self-tapping screws, light bulbs, other trifles, about a kilogram of my nerves ... and most importantly: 8,400 matches. This is 210 matchboxes. I cleaned all the matches from sulfur by hand!


Slowly, persistently and painstakingly, I created platforms for supports and Main Supports ...


When I finished with the bases, I added foam plastic to the ugly sides of the frame, "crumbled" it a little in order to give the effect of a cliff. I put the foil, because I thought that it would be more convenient to make "water" later. The shores were covered with soft material for wrapping fragile items. I decided to do this because what I would use as grass would either not stick to the cardboard, or stick, but would be smeared with glue. Therefore, with a clear conscience, I spoiled this material. And after that it was already possible to glue the "grass" on the banks ...


Which turned out to be very successful. Styrofoam was painted, sand was poured onto the foil and water was made. From a polyethylene film. I burned the film with a melter (in one of the entries about the Model it was about this ...). If you look close, it's very beautiful...

Especially after painting. As you can see, the supports have been started.

And quite successfully completed after a considerable time.


Then, with the help of some mother there, I started the frame for the road. The secret of how I did it, I will not reveal to anyone. His mother, it seems, never opened it. Well, I won’t tell anyone, suffer)


Soon the framework was successfully completed...

And covered with a batch of matches. It turned out to be a good road. By the way, look at the window at the back in this photo and the last one))) And the last one ... Something interesting)))

Swept ... made Christmas trees. Here, see? Close part of the picture. Quite cute. And the photo came out well. A! Pay attention to the ladder on the left! I took care of the pedestrians!

I made a place for the layout. There is a beautiful fabric on the back... Also, pay attention to the light bulbs on the layout. And I also made curtains. They are supposed to be blue, but in this light, when the light comes from within, they appear lilac. Beauty) This is my favorite photo:


And it would be a sin for me not to take a picture with my brainchild. Here I am, happy:

I forgot to thank you. From the bottom of my heart, I would like to thank a few individuals:
Mom for her support, and ... material support) one match turned into a hundred. Mom, thanks! =)
Sister for her admiration
Dmitrich for his awesomeness
Everyone who wrote positive comments on the photos they sent: Ritka, Kristina, Holy Imp, Alena, Dmitrich again, Tanya, Likhacha, Ne4to with Fishek.net, Kostina Nastya! Thank you all!
And also Nirvana, Apocalyptica, Rammstein, Avril Lavigne and Evanescence (especially the last two) for the music, thanks to which it was much easier for me to sit for three hours in one position and repeat the same movement one and a half thousand times (I cleaned the matches)."
This is the kind of magic that today's schoolchildren create, and the older generation continues to scold them ...
Alexandru - our thanks, admiration and admiration. The author's version of the report [
It should be noted that work with matches is not only develops imagination, but also perseverance, tolerance, accuracy and attention.
Crafts from matches can be done with or without glue. If you use glue, then you can attract children, since such work is easier than making crafts from matches without glue.
Matches stick together very quickly and well, so you won’t have any big problems during the assembly process.
You can also use the matches as a whole, or carefully separate them into smaller parts.
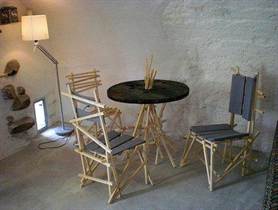
Matches can be used to make both 2D and 3D, including animal figurines, pieces of furniture and houses.
For beginners, it is best to do crafts using glue., and when experience is gained, it will be possible to create crafts from matches without glue.
Helpful Hints:
* The place where you will work with matches needs to be prepared. First you need to cover the table with oilcloth.
* Prepare glue and a saucer in which you will pour it.
* For convenience, it is advisable to take glue with a sharpened match or toothpick.
* For the front side of the craft, it is better to select matches with a flat edge surface.
* If you wish, you can cut off match heads (with scissors or a clerical knife) - this way you will get a more even craft. Such work should be done by adults and keep children away from sharp objects.
How to make a house of matches

To make such a house, you do not need to have a special talent, you just need to know the assembly steps, be careful and have patience.

You will need:
7 matchboxes
2-3 large diameter coins
Disc box.
1. Prepare a base for crafts - it can be, for example, a CD box - and put 2 matches on it parallel to each other.

2. Place 8 matches perpendicularly on the lying matches (the foundation of the house) - this must be done so that there are gaps of the same size between the matches.

3. Put 8 more matches perpendicular to the previous ones (according to the same principle).

4. Now start laying out matches around the perimeter, as shown in the image. You need to make 7 rows (match heads should go in a circle).


5. Lay out 8 matches on the last row so that their heads look in the direction opposite to the first row of 8 matches (the foundation of the house).

6. Perpendicular to the top 8 matches, put 6 more matches in the middle, and put a coin on top of them.

7. Holes have formed between the last two rows in the corners, 1 match must be inserted into them. While you insert the matches, stick to the design.

8. Now stick one match into each gap along the walls and cover the perimeter (see picture).

9. Adjust the structure with your fingers so that all matches fit snugly together.


10. Try to complete the walls of the house by sticking matches around the perimeter of the walls with their heads up.


11. We make a horizontal layer of walls. Insert matches around the perimeter so that their heads alternate with the ends. After that, push in all the matches that start with the head.


12. Let's start making the roof of the house. To do this, insert matches along opposite walls (see picture).

13. Alternate the direction of the matches and insert them perpendicular to the ceiling of the house.

14. First you need to put 2 matches, then 4, 6 matches in two central ones, eight each.


Video lesson
How to make a well out of matches

You will need:
Stationery knife
Scissors
Rope
Cloth to wipe off glue


1. First. What needs to be done is to glue the base of the future match well. It consists of 4 matches (you can cut off the heads of the matches).
2. On top of the base of the well, you need to stick another row of matches, while the matches need to be moved in the opposite direction. All subsequent rows must be done in the same style until the desired height is reached.
3. Now glue racks of three rods (see picture) to the inner opposite walls of the well - two rods at the same level and one in the middle - a few millimeters lower.


4. Glue two rods to the back of each of the rods made in step 3. You will attach the roof of the well to them. Now you can insert the toothpick goal post.
5. Prepare a thread and wind it around a toothpick, lubricating it (the toothpick) with glue in advance. If you like, you can break the end of the toothpick to make a handle.
6. Glue 2 supports to the posts so that you can attach the roof to them. Also insert the beam from above.
7. Before you start gluing matches on top to form the roof, glue 4 beams to the end of each support, and attach matches for the roof to them.
8. All the inclined beams need to be smeared with glue and make the roof of the well, into which you can then lower the thread as a final chord.
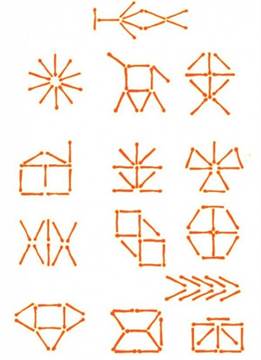
Match wheels (diagrams)

In this example, glue is NOT used, and the strength of the product is provided by internal stress and friction.
There are several options for the wheel: with laying through 1 support match (it has 15 vertices, and 105 parts are used for it), through 2, 3 and 4 support matches, respectively.


Laying through 2 support matches.
The product consists of 95 parts, has 19 peaks and a small diameter that allows it to fit inside a wheel with a large diameter.
Laying through 3 supporting matches
The diameter of this design is even smaller. The wheel has 21 vertices and is made from 84 matches.
Laying through 4 supporting matches
This design is the most difficult to assemble. The wheel has the smallest diameter and can fit inside old match wheels. The design has 22 vertices and contains 66 parts.
Match wheels (instruction)

1. First you need to make an auxiliary tool. To prepare it, arm yourself with a notebook, a simple pencil, a ruler and a compass. You can resort to the help of a protractor, but this is not necessary.
2. Draw a template for the machine. In this example, the drawing will help create a wheel of 15 links. Draw a circle with a radius of 42mm. Next, divide this circle into 15 identical sectors (each sector has an angle of 24 degrees).

* In case you do not have a protractor, make the distance between the legs of the compass 34 mm and draw serifs on the circumference.
3. After you have drawn the drawing of the assembly panel, start making the actual panel itself. A hard cover from an unnecessary book, or thick cardboard will come to your aid. In the places marked in the picture, you need to punch holes in the cardboard using a hammer and a nail.

Cut out the drawing and glue it to the cardboard. Choose a nail with a diameter slightly larger than the thickness of the match. Under the cardboard, place an unnecessary book, or several sheets of cardboard (so as not to spoil the floor with a penetrating nail).

4. When you've got the assembly panel ready, start assembling the wheel - if it has 15 links, then you'll need 90 matches.

* It is advisable to choose matches without marriage.
Insert support matches into the panel.
4.1 Now consistently fill in the gaps with matches. It is worth noting that each next match in each ring must be overlapped with the previous one.


4.2 Raise the first match in the ring in advance so that it overlaps the penultimate and last supporting matches.
Why build such a house I will not explain. Those who want to do it will do it.
Some of the photos below have a magnifying glass in the upper right corner:
Having a magnifying glass taco in the corner of the images means you can click on them to zoom in and take a closer look.
So, we will need:
- Several boxes of matches
- CD/DVD box
- Two-ruble coin
One of our users gives a very useful tip for building a house of matches:
"I suggest using a thinly rolled layer of plasticine or dough instead of a CD, then you can put vertical matches right away and do not suffer to put them in, then it turns out much more convenient and faster and nothing falls apart !!!"
Instead of a box for disks, you can take anything like that or take nothing. Just on the "platform" the future house can be easily moved and twisted without fear of falling apart.

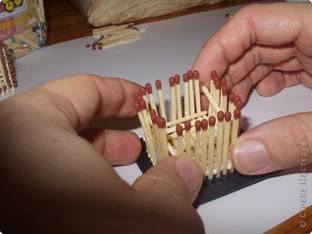
We take the first 2 matches, put them in parallel at a distance of a couple of centimeters from each other.

We make a flooring of eight matches on them. Match heads all look in the same direction. The distance between the matches should preferably correspond to the thickness of the matches.

From above we make another flooring, also from eight matches, but perpendicular to the previous flooring.

On top we lay 4 matches in a well, so that the heads in each layer are directed in different directions as in the photo below.

In the same way, we lay six more similar rows of 4 matches in a well. As a result, we get a well of 7 rows of 4 matches. We direct the heads in the same way as in the previous step. All as per the photo below.

Here's what we've got so far:

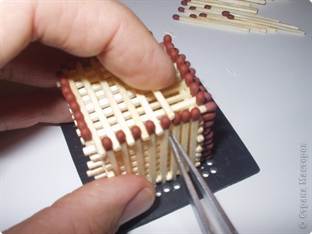
We lay a flooring of eight matches on the well in the same way as the very first lower flooring.

On this flooring of eight matches we lay another one perpendicularly, but already from six matches. The remaining two will be added later.

Insert 4 matches vertically into the corners of the resulting "lattice". Required places in the photo below are circled in red circles. Previously, from above, the entire structure can be covered with a coin and pressed with one finger so that the matches do not crumble. So it will be more convenient. Although you can completely do without a coin.


When installing vertical matches, for convenience, you can correct and guide with an auxiliary match. At the bottom, these matches should be installed in the same way as at the top, that is, in the corners.

At this moment, our future house is still quite flimsy and can fall apart with any carelessness. Do not be alarmed if your top matches "come together" and "disperse". Things will get better a little later.
Now we also insert vertical matches along the perimeter. We lower them to the very bottom, so that all the heads would be on the same level from above.

So far we have this result:

We carefully pull out the coin, we will no longer need it. You can do this with tweezers like me or with a match.

Now our house has got solid walls. To make it stronger, you need to compress its walls, ceiling and floor with your hands from all sides. Now you can carefully take it in your hands, it will not fall apart. Although the design is not yet very reliable.

We twist our house of matches and carefully squeeze it from all sides. The better we crimp, the stronger it will be in the future. Also, we align all the matches so that everything is even and neat and nothing sticks out anywhere.


As a result, we turn our house upside down, that is, we put our house upside down so that the former "foundation" is on top.

We will strengthen the walls - vertically from the outside we start up a new layer of matches with their heads up.

We continue to strengthen the walls and now, just outside, we put a new layer of matches on the walls, but already horizontal. Pay attention to how to arrange the match heads. They should intersect one by one, and not close to each other. See photo for details.
But today I will conduct a small easy master class. You will learn how to make a bridge out of matches with your own hands, as well as the correct assembly scheme. We don’t need a lot of material, and the craft itself is done relatively quickly. If you are going to make a castle out of matches or a town, there must be a bridge, so I'll tell you about it and how to create it in the simplest way.
To create a bridge of matches, we need:
- Matches, seven boxes (we take with a margin).
- Cardboard, the thickness of which is ~ 2 millimeters.
- Acrylic paints.
- Glue.
- A pack of toothpicks.
- Candle.
We take cardboard and cut semi-ovals out of it. Length 30 cm, height at peak 6 cm. In total, you need to cut four blanks, and glue two together.

Here's what should happen. Once again, the width is exactly two matches.

This is how the base for the bridge turns out.

Now we turn to work with matches. We coat them with glue and put them on a cardboard structure. First on one side.

Then we cover the other side with matches. For beauty, we alternate the location of the edge of the match with sulfur.

Now take toothpicks and smearing the tip with glue, insert them into the edge of the bridge, at an equal distance.

We make a railing for the bridge from toothpicks. Hold the parts with your hands until the glue dries.

It remains only to paint the match bridge. We paint it with brown paint, then rub it lightly with a candle and then paint it with white paint. After that, the emery needs to be rubbed a little, this will give our craft.

This is such a beautiful bridge. This is long-term and exciting, I hope you can easily do it.

Creating crafts from matches with your own hands for beginners without glue will interest fans of designing and making figures from unusual materials.
Mastering this skill is not difficult, although beginners will have to work hard to understand the general principle. As a result, building with matches can become an exciting hobby for children and adults. The simplest crafts are made on paper: you can make pictures and make panels from matches. More difficult work - three-dimensional figures. Most often these are houses, wells, baskets and various items. One craft can take more than one box of matches.
This article will tell you how to make various crafts (from simple to complex).
Getting Started
The simplest crafts are made with glue: matches are glued to paper, cardboard or other surface, forming a complete composition.
The principle of execution is similar to a regular application, however, the difficulty lies in the fact that a full-fledged figure cannot be cut out of matches, individual elements are assembled like a mosaic.
To create an applique craft, you will need the following materials:
- cardboard;
- matches;
- PVA glue;
- scissors;
- pencil;
- paints;
First, a sketch is made on a cardboard base. For convenience, it is recommended to use diagrams for future pictures. Also suitable contour drawings as a template.

Matches are laid out along the lines of the picture, they can be cut to the desired size. You can also fill empty spaces in the picture with matches - the composition will turn out to be more interesting and complete. Then the finished match pattern is painted with acrylic paints and varnished. The result is a decorative panel.


Simple applications - children's crafts. Teenagers and adults can try to compose more complex compositions. The dark match heads play the role of the pixels that make up the image.

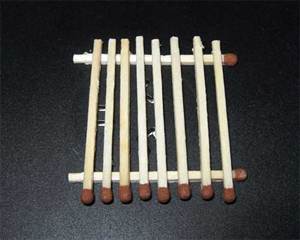
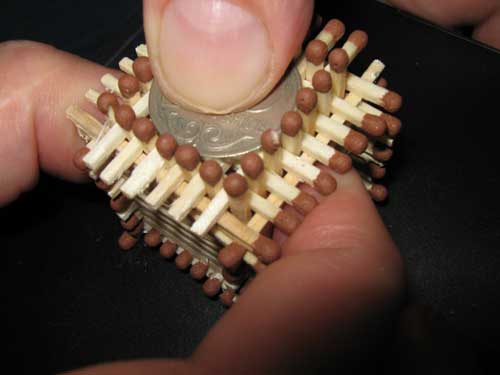
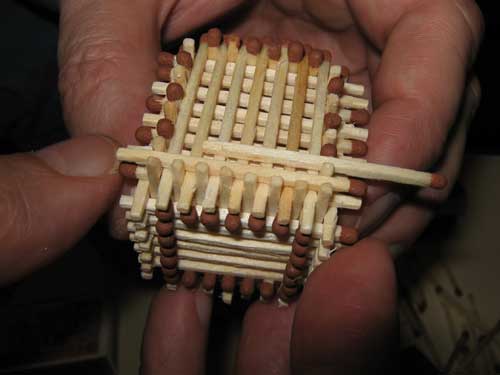
To assemble such a craft, you need to understand how to make a cube out of matches. It's easy to do, just follow the guide. For crafts you need to prepare:
- matches;
- tweezers;
- stand;
- some glue.

A reusable stand can be made independently, for example, from a rubber plate using a ruler and a thin drill. The holes should be at an equal distance from each other and form a square with a width equal to the length of the match or slightly less than it.
You can use thick cardboard, for example, from a box, or clay. The stand will greatly facilitate the work, make it neat and even.
Progress:
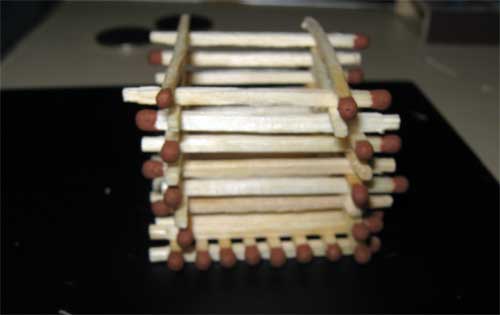
- Set the matches vertically around the perimeter of the stand, without inserting the matches into the corners (it should turn out like in the photo);


- Assemble the bottom: lay the matches between the matches of the two sides;

- Repeat step 2 for other sides (you will get a lattice);

- Lay two matches parallel to each other on two sides, turn the workpiece and repeat for other sides (lay out about 6 rows like this);
- Lay out the last two rows as a bottom (points 2-3);

- Tightly holding the entire structure, remove the cube from the stand;

- Trim each side with your finger;

- Glue (optional) four corner matches for greater reliability.


The cube is ready!

After mastering the cube, you can try to build a simple house, which is done according to the same principle. To do this, you will need the following materials and tools:
- matches (about 7 boxes);
- coins of large diameter;
- work surface (board or box from the disk).
Progress:
- Lay two matches parallel to each other on the work surface;

- Put 8 matches on top of the matches at an equal distance;
- Perpendicularly repeat point 2;

- Lay out two matches on opposite sides, and then repeat for other sides;

- Repeat step 4 until you get 7 rows, while the match heads should go in a circle;
- In the last row, lay out 8 matches so that the match heads look in the opposite direction to the foundation;

- Put 6 matches perpendicularly, put a coin on top;

- Holding the whole structure with a finger with a coin, insert the matches in the corners (should frame the top 6 matches);

- Insert matches into the gaps between 6 matches on all sides (according to the size of the coin);

- Correct the entire structure with your fingers and remove the coin;

- Complete the walls by sticking matches vertically and horizontally and alternating heads with ends;

- Stick the matches with their heads up at the corners of the structure;

- Stick matches so that they are on the same level on two opposite sides, and form a triangle on the other two;

- Lay between the two "triangles" matches, as shown in the figure, alternating heads with ends;

- Lay the matches perpendicularly with their heads up on two sides to form a roof slope.

A simple house is ready!

There are different assembly methods, as well as other models of houses. A master class of another assembly can be viewed in the videos below.

If you add a fence, a table, a bench and a well to the resulting house, you get a whole village or country yard. These figures are easy to assemble with glue.

Video on the topic of the article
You can see more about creating crafts from matches in a selection of videos.
Related publications
-
 Simple New Year's crafts with children: inspirational ideas and master classes
All children love to make various crafts with their own hands, especially if loving and caring parents help them with this. Beautiful and lovely...
-
 What is the best way to dress for nature?
If you are going on a picnic trip with family or friends, this does not mean that you have to dress in sweatpants and...